搜尋此網誌

顯示具有 小技巧 標籤的文章。 顯示所有文章

2013年1月3日 星期四

Predefined macro names - ANSI C


The following names shall be defined by the implementation:

__LINE__
The line number of the current source line (a decimal constant).
__FILE__
The presumed name of the source file (a character string literal).
__FUNCTION__
Valid only within a function and returns the undecorated name of the enclosing function (as a string). __FUNCTION__ is not expanded if you use the /EP or /P compiler option.
__DATE__ 
The date of translation of the source file (a character string literal of the form "Mmm dd yyyy", where the names of the months are the same as those generated by the asctime function, and the first character of dd is a space character if the value is less than 10). If the date of translation is not available, an implementation-defined valid date shall be supplied.
__TIME__
The time of translation of the source file (a character string literal of the form "hh:mm:ss" as in the time generated by the asctime function). If the time of translation is not available, an implementation-defined valid time shall be supplied.
__TIMESTAMP__
The date and time of the last modification of the current source file, expressed as a string literal in the form Ddd Mmm Date hh:mm:ss yyyy, where Ddd is the abbreviated day of the week and Date is an integer from 1 to 31.
__STDC__ 
The decimal constant 1, intended to indicate a conforming implementation.
The values of the predefined macros (except for __LINE__ , __FUNCTION__ and __FILE__) remain constant throughout the translation unit.

2011年9月22日 星期四

How to use "Diskpart" in Windows Installation CD?

  1. Press Shift + F10
  2. Type \> diskpart                                      /*0 being the disk to setup*/
  3. Type \> clean                                           /*Wipe the Disk*/
  4. Type \> convert gpt                                 /*Convert disk to GPT*/
  5. Type \> create partition efi size=200    /*EFI system partition size is 200M*/
  6. Type \> assign letter=s                           /*Any allowable letter*/
  7. Type \> format quick fs=FAT32             /*Format the ESP*/
  8. Type \> create partition msr size=128  /*Create the MSR partition and its size is 128M*/
  9. Type \> create partition primary             /*Create Windows OS partition*/
10. Type \> assign letter=c
11. Type \> format quick fs=NTFS               /*Format primary(Windows OS) partition*/
12. Type \> exit                                               /*Leave this utility*/

2011年7月5日 星期二

Marvell eXtreme Debugger(XDB) - How to set or dump memory?

Write Memory/Registers:
> set value /size=long 0xD0015178=0x8d
set value /size=long 0x100038a0=0x00000100

Read Memory/Registers:
> evaluate /hex *((unsigned long*)0xD0015178)
> show memory /size=long 0x64008098 
> show memory /size=word 0x64008098

2011年4月27日 星期三

WinDeg的環境設定

Target Computer and Host Computer
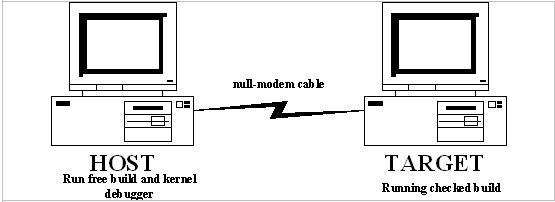
Kernel-mode除錯需求要一台target computer 和一台host computer。使用這台target computer去執行kernel-mode程式。而使用這台host computer去執行debugger。
如下圖形態顯示安裝Microsoft® Windows® ,使用它去執行核心的除錯與診斷系統的失效。
Typical Windows Debugging Setup
這圖說明典型的架構。然而目前KD和WinDbg的版本,任何一個都附有其安裝文件,非常的有彈性:
  • 當執行使用Windows NT® 4.0, Windows 2000, Windows XP, 或更新的Windows的作業系統,他們能夠在一台target computer上除錯。
  • 當執行在x86 platform, Intel Itanium platform, 或x64 platform,他們能夠在一台target computer上除錯。
  • 當執行使用Windows NT® 4.0, Windows 2000, Windows XP, 或更新的Windows的作業系統,他們能夠在一台host computer上開始下命令。
  • 當執行在x86 platform, Intel Itanium platform, 或x64 platform,他們能夠在一台host computer上開始下命令。
Target computer和host computer可以使用在不同的硬體工作平台或是不同的Windows作業系統。
Kernel debugging不需要體指明要建構free或checked。它可能來自free或checked 系統去free系統除錯,或來自free或checked 系統去checked系統除錯。不管怎樣,通常在沒又任何動機情況下Host computer是建立執行監視的動作。
注意:如果你在Itanium host computer執行除錯器,你應該確保你使用到正確的二進位版本。查看細節選擇32-bit64-bit Packages


Setting Up a Null-modem Cable Connection
當host computer和target computer在同一部電腦, 或當你需要去放一台本地host computer對應遠端存取server (RAS),其功能如target連接一個遠程的host,這兩台電腦的連接必須透過除錯(null-modem)連接線或是IEEE 1394 ("FireWire")連接線。
這個部分描述如何去掛接上除錯連接線,如果你使用1394連接線,請看Setting Up a 1394 Cable Connection
Null-modem連接線是序列連接線,它必須安裝在兩個Serial Port才能去送資料。它們使用在大部份的電腦儲存裝置。不要搞混null-modem cables跟不是做連接Serial Port 的standard serial cables。如果在相同的電腦除錯一個失敗的user-mode行程,你直接撥到target system's modem,或分析拋棄掉的檔案, 要使用一條null-modem的連接線是不需要地。

COM Ports

這系統默認值關於serial port除錯的輸出,從target computer高一點的Port(通常是COM2)。這可在開機選項設定改變除錯Port。對於細節請看Configuring Software on the Target Computer
這系統默認值serial port對於除錯的輸入到Host computer的COM1。這可以改變經由_NT_DEBUG_PORT的環境變數riable。對於細節請看Configuring Software on the Host Computer

Null Modem Cable Construction

如果你不曾去接近null-modem cable,或如果你比較喜歡自行製作硬體接線,接下來的資訊可能對你有些幫助。
標準商用null-modem cable是利用下面的配置方法:
  • Transmit Data connected to Receive Data
  • Receive Data connected to Transmit Data
  • Ground connected to Ground
對於9-pin和25-pin D型連接器(分別認識db9db25),硬體的協定如下:這電線需連結接收Pin(RXD)到發射Pin(TXD),TXD接到RXD,還有Ground (GND) 接到GND。另外, 每個接線端應當將Data Terminal Ready (DTR)連接到Data Set Ready (DSR),與Request to Send (RTS)連接到Clear to Send (CTS)。
下面的表格中顯示許多pins的關聯性:
9-pin Connector
25-pin Connector
2 (RXD) 2 (TXD)
3 (TXD) 3 (RXD)
4 (DTR) 6 (DSR)
5 (GND) 7 (GND)
6 (DSR) 20 (DTR)
7 (RTS) 5 (CTS)
8 (CTS) 4 (RTS)
這debugger在host不依靠任何控制接腳(例如DTR, DSR, RTS, or CTS)。然而, 你可能需要去放入跳線在連接線兩邊的連接器端點,從DTR接到DSR,還有從RTS接到CTS,如下:
Connector
Jumpers
db9 From pin 4 (DTR) to pin 6 (DSR)
From pin 7 (RTS) to pin 8 (CTS)
db25 From pin 20 (DTR) to pin 6 (DSR)
From pin 5 (RTS) to pin 4 (CTS)
在host和target computers之間,連結null-modem的連接線到serial port。


Setting Up a 1394 Cable Connection
當主電腦在相同位置作為一台控制端電腦,或當你需要放一本地端主電腦具有遠端存取伺服器remote access server (RAS)能力在控制端與遠處主機之間。 這兩台必須連接debug (null-modem)線IEEE 1394 ("FireWire")線任何一種。
核心除錯經由一條1394的線,它不支援所有系統。控制端電腦必須使用Windows XP或更新的Windows作業系統版本,同樣的主機也必須執行在這些系統中的一種(控制端跟主機端不必一模一樣的Windows的版本)
控制端電腦與主機各自都需要一張1394的卡。在使用一條1394的線接入這兩張卡的1394阜。卡上的阜將不被限定必須在哪一個阜,它將不會影響通道的編號,此編號將被使用在軟體安裝。
如果你使用除錯連接線(null-modem)取代1394連接線,請參考Setting Up a Null-modem Cable Connection章節。
注意:在使用1394進行核心除錯之前,你必須正確的設定主機與控制端兩邊的軟體。細節請參閱Disabling the 1394 Host ControllerInstalling the 1394 Virtual Driver


Testing the Connection
在主機與控制端系統用null-modem去連接,在有效確認開始這除錯器之前。你可以使用超級終端機程式(Hyperterminal),去確認連線是否完成
注意:在 Windows Server 2003與更新的Windows 版本。 超級終端機程式(Hyperterminal)在一般安裝的情況底下將不被安裝,不過,你可以安裝超級終端機程式(Hyperterminal)從 Windows的安裝光碟。

測試null-modem的連接
  1. 在主機上按下[開始]紐, 移到[程式集],然後移到[輔助程式],然後在移到[通信],然後按超級終端機。如果超級終端機沒被安裝,請安裝它從產品光碟從控制台使用[新增/移除程式]
  2. 在連接說明對話框,輸入一個新連線名稱。(名稱無須在意,也不會影響任何行為)
  3. 在連結的對話框,點選連接使用的下拉式選單。選擇COM阜與符合這null-modem線的設定在此機器上。
  4. 接受系統預設值當作COM阜的屬性,在下一次的對畫框。
  5. 重複步驟14,對於控制端電腦。
  6. 超級終端機開啟與準備做測試,輸入字元串在主機端,如果null-modem 線正確的被安裝與正確的兩端COM阜的軟體設定。當兩端都開啟超級終端機的前提,在主機端輸入的字將顯示在控制端;在控制端輸入的字串將顯示在主機端。

如果在主控端鍵盤敲擊的字沒被顯示在控制端,確認線已經被連接在兩端。也確認null-modem的線在迴授的連接也是可以的。
當可能的COM阜問題都已通過線路的檢查。控制端建立一個新連線在超級終端機上,使用一個替代方案COM阜接著步驟2到5和重置。
如果這問題沒被解答,在主機端試著更換到其他的COM阜。如果問題還在的話,改變控制端系統的Com阜的設定值回到原始設定和重置。最後正確的配置值將會被設定與此測試將成功。
如果在幾次重複的COM阜重新配置與最後使它能夠工作,你忘掉哪一台使用哪一個阜,在超級終端機點選檔案選單與選擇屬性去顯露正確的阜設定當作一個除錯交談。

How to trace your driver in windows XP/2003?

1. Edit at c:\boot.ini or others:\boot.ini
Please install WinDbg that is powerful to help trace your source code.


2. If you want to use com port, please add red parts as below:
[boot loader]
timeout=30
default=multi(0)disk(0)rdisk(0)partition(1)\WINDOWS
[operating systems]
multi(0)disk(0)rdisk(0)partition(1)\WINDOWS="Microsoft Windows XP Professional" /noexecute=alwaysoff /fastdetect /debug /debugport=com1 /baudrate=115200


3. If you want to use 1394, please add as:
==>/debugport=1394 /channel=xxx    xxx is number that it must match with Windbg's setting.

4. Connect debugging platform to your computer with a RS232 or 1394 cable.


A(debugging platform)                            B(Your Computer)
PIN 2 <----------------------------------------------> PIN 3

PIN 3 <----------------------------------------------> PIN 2
PIN 5 <----------------------------------------------> PIN 5


5. Where can I get the Windbg?
Debugging Tools for Windows 32-bit Versions
Debugging Tools for Windows 64-bit Versions


6. Double clicks and install it.

7. Choose Symbol File Path.
(1).And set Symbol Path.
(2).Choose Sourcel File Path
(3).Set Source files Path.
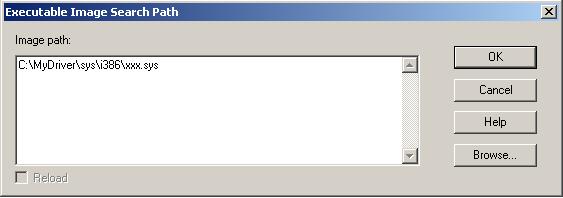
(4).Choose Image File Path
(5).Set Executable Image Search Path.


8. Open your Windbg and choose "kernel debug".


9. Set Port and baudrate.
Or
10.After Click Ok, Windbg will connect with Windows Platform.


2011年4月26日 星期二

RealView Debugger[設定]與[讀取]記憶體指令

讀取
dump [Type] [Address]
>>dump /32 0xd0001000..+4

寫入
>>setmem /32 0xd0001000=0x55AA55AA
[Byte] /B=/8
[Word] /H=/16
[Double] /W=/32